The Property Definition Configuration area is where you can set up certain Property System defaults such as the property name and address information, default language, and defaults to display on the web.
This is part of the required configuration for Skyware Systems and is initially performed at installation for you. You may however edit the configuration to suit your property at any time if you have the appropriate access/authorization.
This selection is part of the Property and System Configuration area of Skyware.
How to Configure Property Definitions:
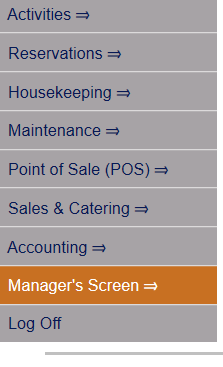
Select Managers Screen from the Quick Menu on the left side of the screen, then select Configuration > Property Definition.
OR
Click the icon on the left for the Full menu.
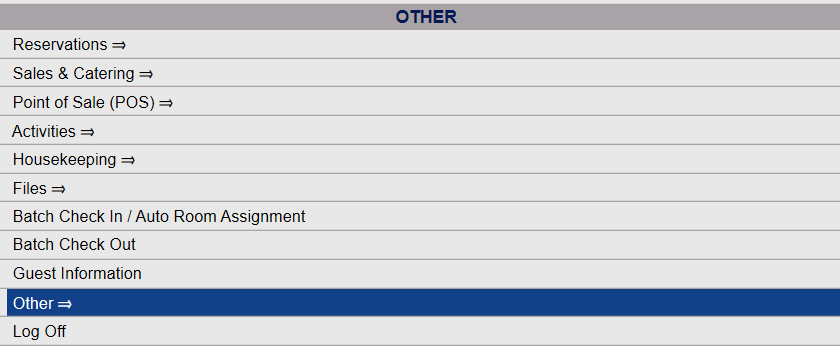
This will display the Full menu in a tabular form, with four sections, Registration, Status, Cashier and Other.
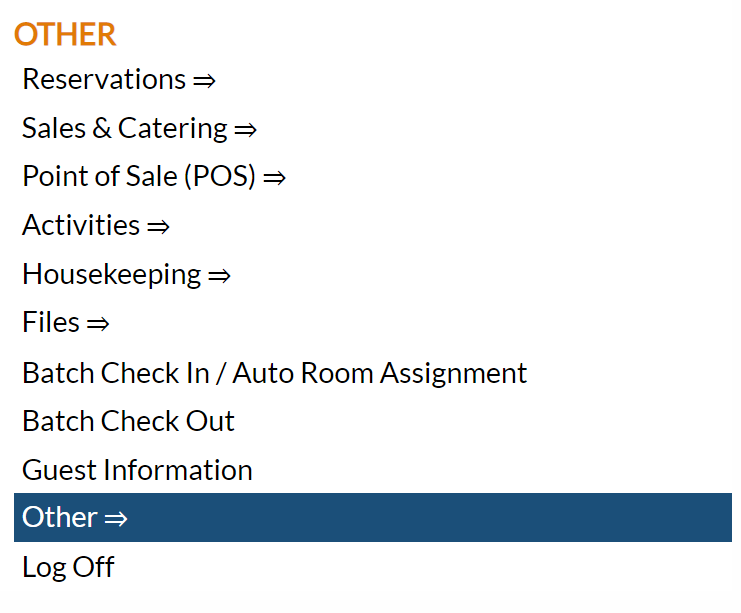
From the Other Section, select Other =>.
This will display the Other Front Desk Tasks Menu, divided into four sections: Other List 1, Other List 2, Documents and Web.
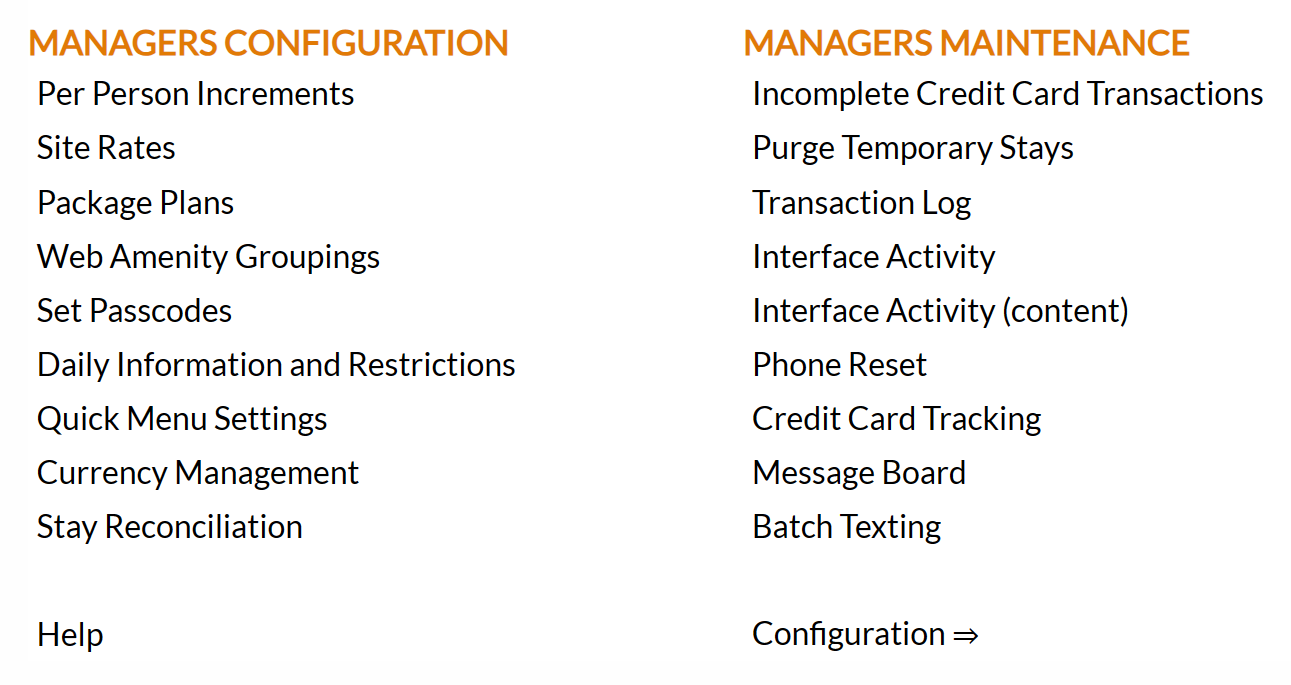
From the Other List 2 section, select Manager's Screen => to be taken to the Manager's Commands Menu screen.
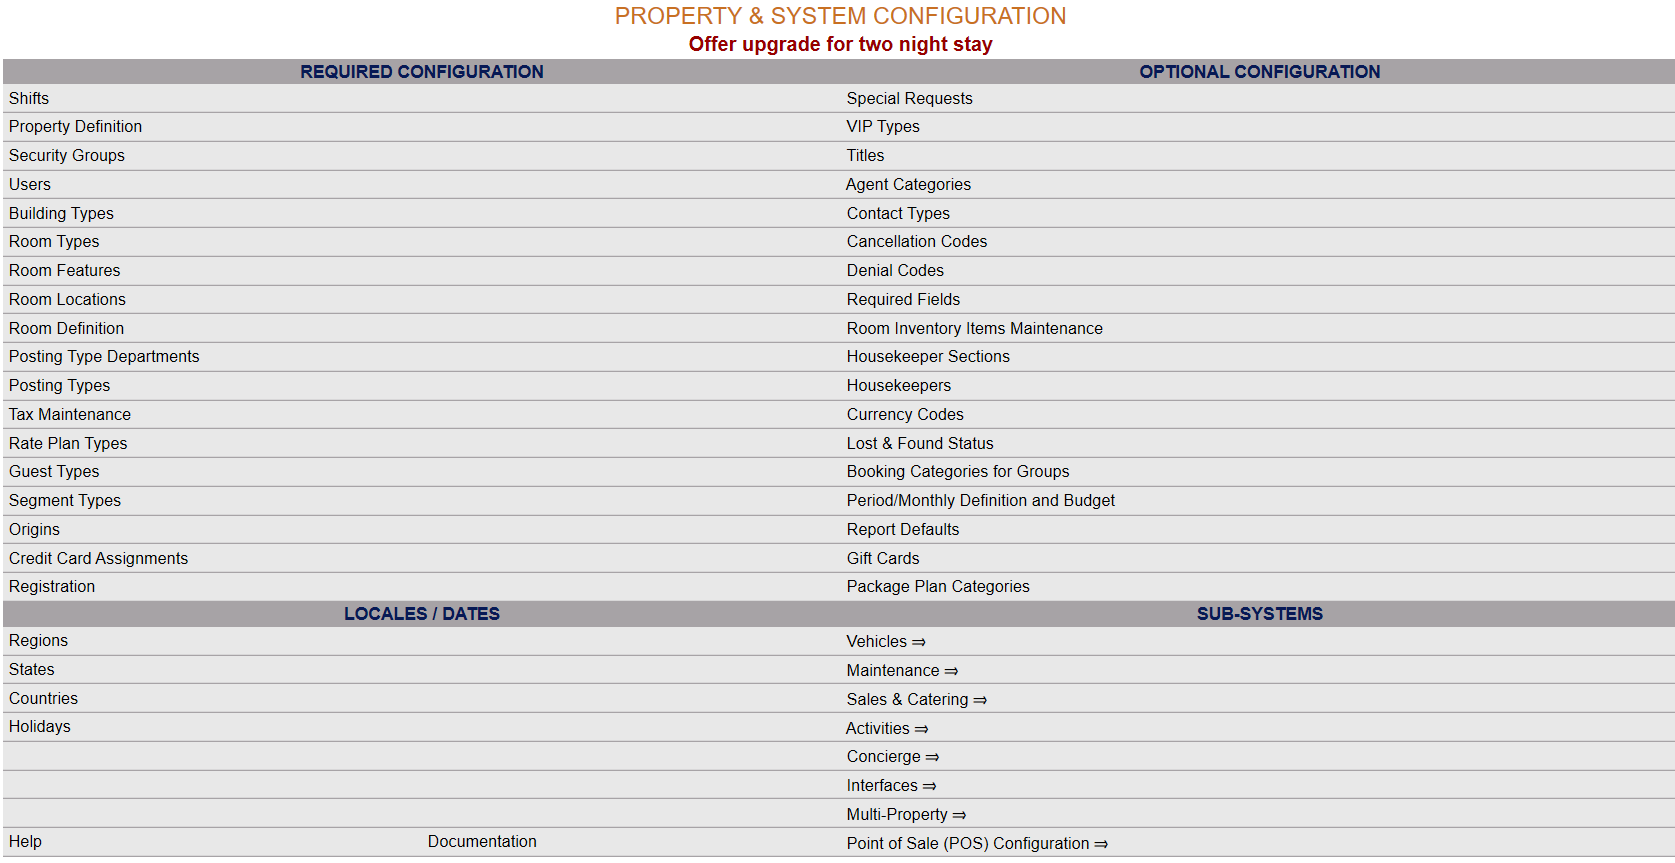
From the Manager's Commands Menu, select Configuration to be taken to the Property and Configuration Menu screen.
Alternately, you may also be able to select Configuration directly from the Quick Menu, if the menu has been set up to include the Configuration option. This will also take you to The Property and System Configuration Menu.
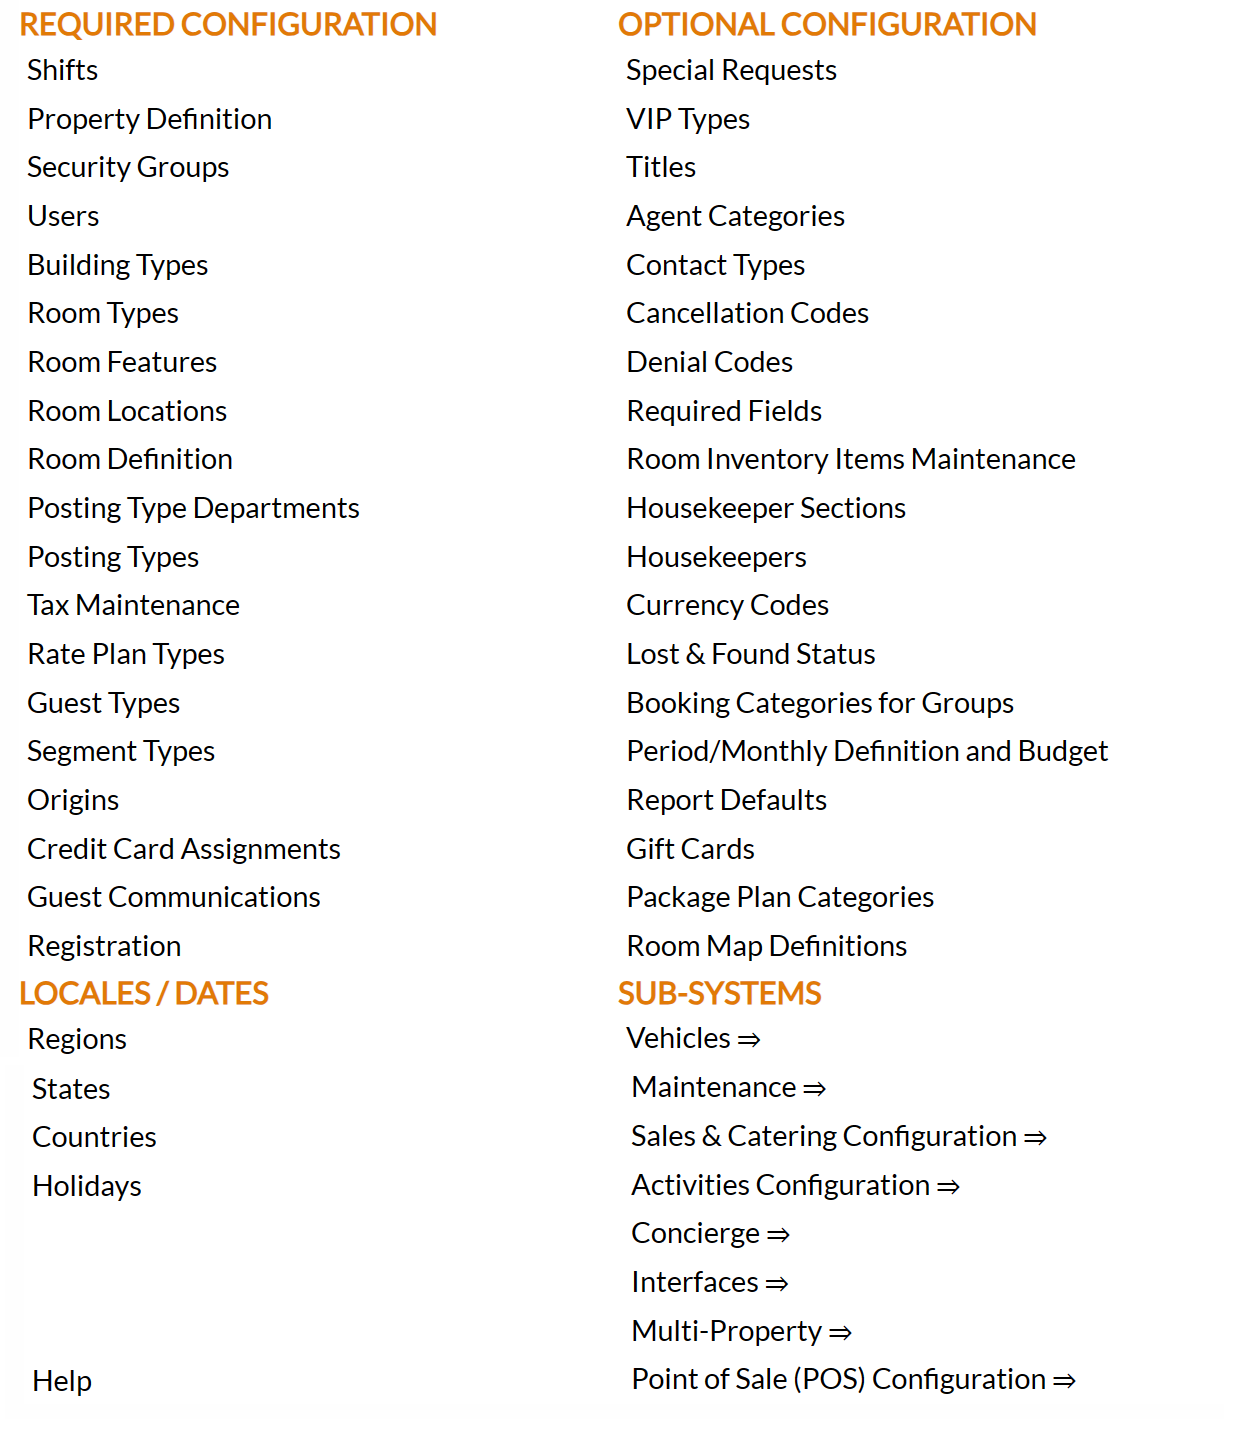
The list of property configuration options are divided into four sections, which are Required Configuration, Optional Configuration, Locales/Dates and Sub-Systems.
Select Property Definition from the Required Configuration section.
The Property Definition screen display is split into two frames, with the left side of the screen listing the Properties and the right side containing the fields you need to complete in order to add or edit the configuration for the Property. Any changes made on the right, once saved, will be updated in the listings to the left.
By Default, the General tab will be open when you arrive at the Property Definition screen. Almost all of the required information is located on this tab, such as the Property name and address. There are six more tabs available, the Other tab, the Credit Cards / Int tab, the Statement / POS tab, the Reg / Conf tab, the Web / E-Mail tab and the Web Code tab.
The General tab contains essential Property information such as your name and address, and Property contact details that will be used on integrated documents, for example Confirmation letters.. Please ensure all required fields are complete.
Property Name: This is the full Property Name, as it will be displayed on integrated documents, for example Confirmation letters.
This field is required.
Short Name: This is the Short Hotel Name used for reports and selecting. This will only be seen internally.
This field is optional, if none is entered the Property Name will be used at all times.
ID: Each of your properties in Skyware Systems will have been assigned an ID during install.
This field is required, and this field is Read Only. It is a static ID set by Skyware Systems.
Not Active?: This box may be checked or unchecked. By default, it is unchecked.
It should only be checked if the Property is no longer in use, and thus is for Skyware Systems Use only.
Once a Property has been added to the list on the left, it will remain in the list (cannot be deleted) if there has been any checks created for it. Once a check is created, it exists in several places in the system, and therefore there cannot be a check for somewhere that does not exist.
Address: This is the street address for the Property.
This field is required.
Postal Code: This is the mailing code for your street address.
This field is required
City:This is the City in which your Property resides.
This field is required
County: This is the County in which your Property resides.
This field is optional.
State: This is the State in which your Property resides, represented by the two letter abbreviation.
This field is optional. It can be completed manually or clicking the search icon will open up a separate window with all the States listed. Clicking on one from the list will automatically close the window and enter it into the field for you.
Name: This is the State name.
This field is optional. You can choose to manually enter the complete name for the state in which your Property resides.
Country: This is the Country in which your Property resides, represented by the two letter abbreviation.
This field is required. It can be completed manually or clicking the search icon will open up a separate window with all the Countries listed. Clicking on one from the list will automatically close the window and enter it into the field for you.
Phone: The phone number you wish to be associated with this Property.
This field is optional.
Fax: The Fax number you wish to be associated with this Property.
This field is optional.
Home Web Site: This is the full URL for the Property web site.
This field is required.
Current Shift: This is a drop-down menu of all available shifts configured in your system. Select one.
This field is required.
Web Rate Plan: this is the default Rate plan to be used by the General Web reservation system. This is a drop-down menu of all available Rate Plans configured in your system. Select one.
This field is required.
Default Language: This is the language chosen for Skyware Systems at the Property. This is a drop-down menu of all available languages. Select one.
This field is optional. The default option is English, you only need to make a different selection if you do not wish the displays to be in English.
Default Building: This is the Default Building for room selection. This is a drop-down menu of all available buildings. Select one.
This is the default for anywhere in the system showing rooms, so it would show on the Room Availability screen, the Room Scan and Room Chart and setting Room Conditions. It is used as a default building THROUGHOUT Skyware Systems. Therefore, if you have multiple buildings, you will want to leave this field blank, which will default to ALL.
This field is optional. The default option is Main, you only need to make a different selection if you do not wish this to be the case.
Time Zone: This is a drop-down menu of all possible Time Zone choices for the region your Property resides in. Select one.
This field is required.
Financial System Date: Each of your properties in Skyware Systems will have been assigned an Financial System Date during install.
This field is required, and this field is Read Only. Please contact Skyware Systems to discuss any changes required here.
Overall System Date: Each of your properties in Skyware Systems will have been assigned an Overall System Date during install.
This field is required, and this field is Read Only. Please contact Skyware Systems to discuss any changes required here.
Note: These two fields are usually the same but do not need to be, depending on your own fiscal year.
These System Dates are the current dates on your Skyware system based on the last time the Night Audit
was run. If your Property has been closed and you need your system brought up to date, please
contact Skyware Systems.
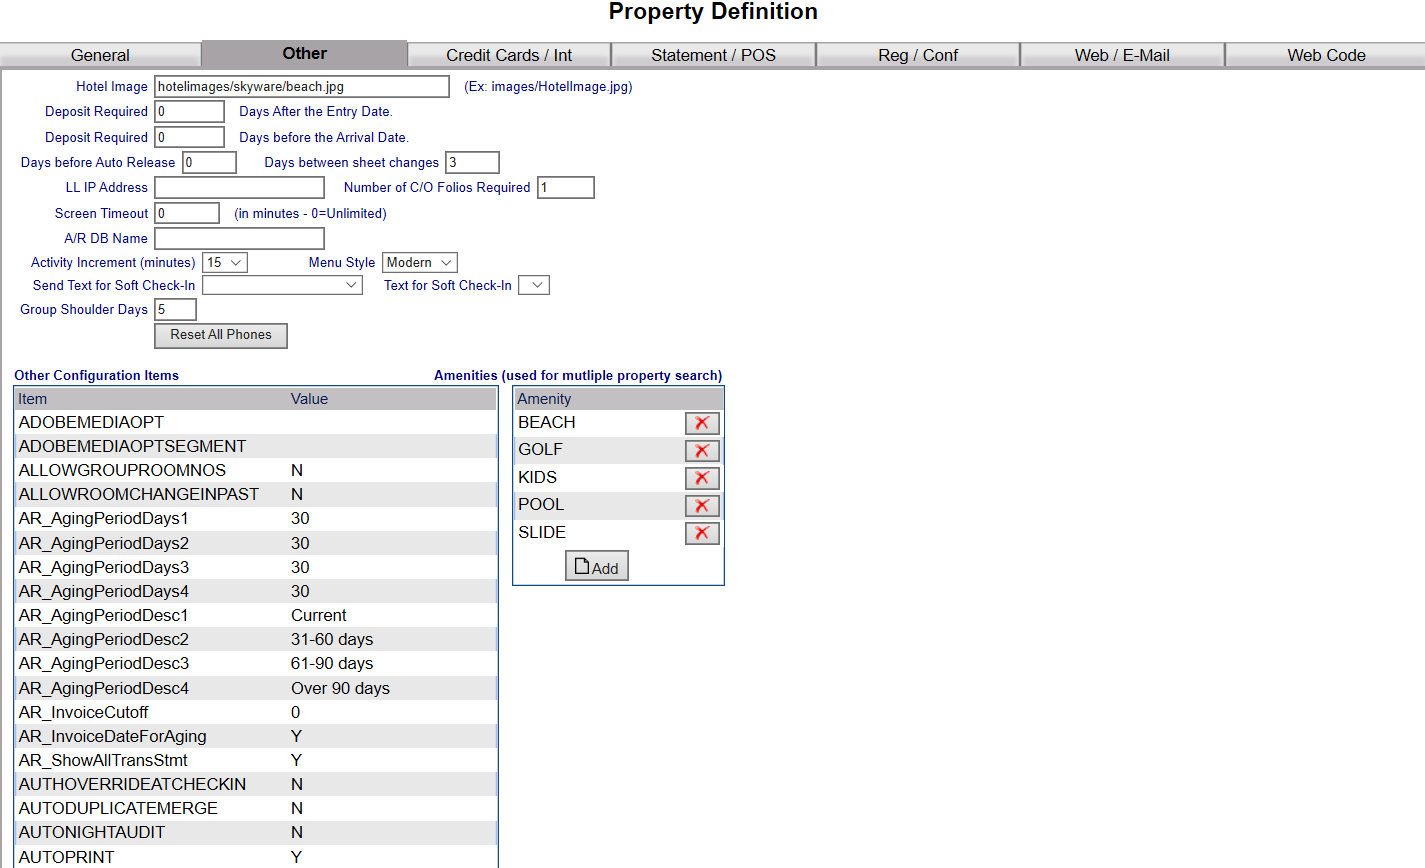
The Other tab contains information about various other Property Definitions, including about the picture that will appear on your web site for web reservations, deposit defaults, an Auto-Release (Room Block) default, number of folios to print at check out, amount of inactive time before the user is automatically logged out, a custom statement form and some accounting and miscellaneous check flags.
Hotel Image: This should be a link to an image of the Property. (For example: images/HotelImage.jpg)
Does your property require a deposit? If so:
Deposit Required: (Days After the Entry Date): Enter a value (for number of days) in this field IF you require the deposit a certain number of days after the reservation is made.
Deposit Required: (Days before the Arrival Date): Enter a value (for number of days) in this field IF you require the deposit a certain number of days before the guest arrival date.
Days before Auto Release: This should be the number of days (prior to the arrival date) before a Group Block is released. By default it is set at 0.
Days between sheet changes: This should be how many days can pass before the sheets are changed in a continuously occupied room (with no guest change).
LL IP Address: Lodging Link IP address should be entered here.
Number of C/O Folios Required: This is the number of Check-Out folios to print at check out. The minimum is 1; this option will default back to 1 if 0 is entered.
Screen Timeout: This is how many minutes the screen can remain inactive (no cursor movement) before Skyware Systems times out and automatically logs out. 0=unlimited (i.e. no timing out will occur).
A/R DB Name: Type in the Accounts Receivable SQL Server Database name here.
Activity Increment (minutes): For use with the Skyware Activities Module. This is a drop-down menu. Select one (15 minutes, 30 minutes or 60 minutes) or this can be left blank.
Menu Style: Skyware Systems has four menu options, the "Classic" style (pale blue background), or three "Modern" styles, Modern Curve (white background), Modern Straight (pale blue background) and the most recent, Modern Light (white background) for displaying Skyware. Choose one.
Note: This will affect ALL users.
Note: Usually a white (Modern) style is displayed, but in high brightness conditions the interface may be easier to see with a blue option selected.
Send Text for Soft Check-In: You can choose to allow a soft Check-In for different room options: Select one from the drop-down menu. For use with Skyware’s Texting interface (please contact Skyware for initial set-up).
Text for Soft Check-In: IF you have selected to allow soft check-in, you MUST also select a text for implementing this. Custom messages for soft check-in are set up via the Texting Custom Messages (Stay) command under the Interfaces Maintenance Menu (reached from the sub-systems area of the Configuration Menu).
Group Shoulder Days: This is the number of days set as default number of Group Shoulder days for groups with pick-up outside the block set.
Reset all phones: If you have the ability, and if you need to reset the phones for some reason there is a button here to click to allow that. This is used for properties who have a phone interface that displays Guest names. If the names aren’t appearing correctly (not updating when checked out/in) the reset should solve the issue.
Other Configuration Items: This is a large table displaying the results of other configuration items in Skyware Systems areas that you can see in one area, to see how your system is configured at a glance. If you need to change the configuration of one of these items (such as VAT tax) you will need to go to the specific configuration screen for that task, by clicking on the line item. This table is display only in the Other tab. See Property and System Configuration Overview for more details and links to specific configuration areas.
Note: The Other Configuration Items table includes the line items used for extracting accounting system export reports, for the automatic reporting of revenue data. The line item selected will be dependent on the accounting software your Property uses. Please see How to Configure Accounting Export Reports for more information.
Amenities (used for multiple property search): This table represents the amenities your Property has available. You CAN add or remove items from this list; when clicking on an item entry you will be taken to the Amenities Configuration screen where you can configure the amenities for your various Properties.
The Credit Card tab contains user and vendor information if you are using the credit card Interface. Skyware Systems integrates with several different Credit Card gateways (including Shift4, Tenerum, and Verisign as well as historically with USAePay). This information will be provided by your gateway provider once the interface/service has been purchased.
Card Processor: This is the name of the company supplying your Credit Card gateway. Select the relevant one from the drop-down menu of available options.
This field is required. You cannot process Credit Card payments without some kind of gateway provider.
Note: The default option is "NONE". If you do not use a credit card processor, leave this option selected. If "NONE" is selected, the Token options will NOT be available. Depending on which credit card processor is selected, the additional options may vary. There will be several fields or a table specific to your gateway provider on this screen (such as Customer # or ID) ; and the information in them is provided by your specific provider, not Skyware Systems.
For example:
Several of the credit card processors require the use of tokens. If so, the token check boxes will be shown.
Use Tokens Only (no CC info will be stored): This box may be checked or unchecked. If checked Skyware Systems will NOT store any credit card numbers.
Use Tokenizer (Tokens Only): This box may be checked or unchecked. If checked no Credit card information will be stored or transmitted.
No matter which credit card processor is selected, the next two check boxes will always be available:
Credit Card Offline Mode : This box may be checked or unchecked. by default it is unchecked. This check box allows you to place Skyware into the Credit Card Offline Mode and should ONLY be checked if the credit card processor is down and unable to process credit card payments that need to be taken. Any check-ins or check-outs that ARE performed in this mode will need to have the associated credit card processed at a later time, when the gateway is working again.
CSC/CVV Not Required: This box may be checked or unchecked. by default it is unchecked. If it is checked, the CSC/CVV will NOT be required by the credit card processor. Normally, the CSC/CVV number is required.
This tab also contains configuration options for Credit Limit Authorizations and Automatic Charges.
Several of these options may also be set for specific Room Types during their configuration - in which case the values set on the individual Room Type will OVERRIDE the values set here for GENERAL Property wide values. If no values are set in Room Type configuration, those set here will be used. See Room Types for more details.
Additional Percent to Add to an Authorization : This is per night of the Stay. You can fill in an amount. By default it is 0.00.
Additional Amount to Add to an Authorization : This is per night of the Stay. You can fill in an amount. By default it is 0.00.
Additional Amount Per Stay to Add to an Authorization: This is for the total duration of the Stay. You can fill in an amount. By default it is 0.00.
Additional Percent to Add to an Authorization (Restaurant): This would be an automatic gratuity on a restaurant check. You can fill in an amount. By default it is 0.00.
Automatically Charge 1st Nights Revenue: This check box may be checked or unchecked. By default it is unchecked. if you check this, ONE NIGHT room charge and tax will be charged (pre-paid for the stay).
Note: This CANNOT be used in conjunction with any authorization.
Set the credit card encryption key: This box is grayed out if your Property uses any credit card processor gateway and is only available if the option "NONE" has been SAVED in Skyware as your card processor. If available, it will open the Credit Card Encryption Key screen as a separate screen, where the key can be entered or altered. Please contact us for assistance if needed, at 877-759-9329 (SKY-WEB9), or email us at Support@SkywareSystems.com.
This tab also contains configuration options for (Maid) Interface interactions:
the Maid Dial In codes for the interface with PBX machines (which allows housekeepers to punch a code into a guest room's telephone that transmits to Skyware the condition of the room) are configured here:
Maid Interface (Inspected): This is the maid interface CODE for an inspected room. The default value is -0- (no code). Type in the desired code. (For example, typically 72 is used for inspected).
Maid Interface (Pickup): This is the maid interface CODE for a room requiring pick-up. The default value is -0- (no code). Type in the desired code.
Maid Interface (Dirty): This is the maid interface CODE for a dirty room. The default value is -0- (no code). Type in the desired code.
Maid Interface (Clean): This is the maid interface CODE for a clean room. The default value is -0- (no code). Type in the desired code.
The Statement tab allows you to select a custom statements (provided you have created one in the documents area); or hide the header and/or add custom information that will appear in the footer of Skyware's standard statement.
Custom Statement: You can select one from the available options in the drop-down menu, or leave it blank to use the standard Skyware Systems statement supplied. If the option you desire is not available in the drop-down menu, you can create one. See How To Create or Customize Your Documents for more details.
Hide header on statement: This box may be checked or unchecked. By default it is unchecked. If it is checked, the header on the standard Skyware Systems statement will not be visible when you use it.
You can use the field below to add custom statement text located in the page footer (use HTML tags for specific formatting) of Skyware's standard statement.
Custom Print Receipt: You can select a custom restaurant check receipt to print from the available drop-down menu.
Copies: This is how many copies of the check will be printed out for the restaurant check. The default option is -0- (meaning no copies will be printed). Type in the number desired.
Custom Payment Receipt: You can select a custom restaurant payment check receipt to print from the available drop-down menu.
Custom Kitchen Check: You can select a custom kitchen check to print from the available drop-down menu. This is where the restaurant check will be sent after firing in the restaurant.
or Kitchen Printer Name: If you enter something into this field the location will be used instead of the custom kitchen check. This is used ONLY with Skyware’s Direct Connect Printer setup.
Default Condo Statement: This is the default condo statement document. You can select one from the available options in the drop-down menu, or leave it blank to use the standard Skyware Systems statement supplied. If the option you desire is not available in the drop-down menu, you can create one. See How To Create or Customize Your Documents for more details.
The Reg/Conf tab allows you to select a custom Registration or Confirmation card (provided you have created one in the documents area); or add custom information to appear in the footer of Skyware's standard registration cards or confirmation cards. You will also use this tab if you wish to send automatic custom confirmation e-mails to your guests, which may include an electronic signature request. See Electronic Document Signing for more details.
Custom Registration: You can select one from the available options in the drop-down menu, or leave it as the default standard Custom Registration Card. If the option you desire is not available in the drop-down menu, you can create one. See How To Create or Customize Your Documents for more details. The text field below can be used to add custom Registration Card text (using HTML tags for specific formatting) to the footer of Skyware's standard registration card.
Signature Pad Text: This button can be used to set the digital/electronic signature Pad lines. If clicked, it will take you to the Signature Pad(s) screen where you can select or add the text to be shown on the screen of the electronic signature capture device, if your Property uses one. See How to Set-Up and Use Electronic Signatures for more details.
Custom Confirmation: This is a drop-down menu of the available options. You can select one from the available options in the drop-down menu, or leave it as the default confirmation. See How To Create or Customize Your Documents for more details.
You can also use the button next to it to it to send out automatic emails of custom email confirmations for specific dates. Clicking the button will take you to a new Document Dates screen where you can select the dates your confirmation document will be sent between.
Once you have selected the dates for the custom confirmation you can return to the Property Definitions screen by clicking the "Property Definitions" button in the local tool bar.
Automatic E-Mail at time of Reservation: This box may be checked or unchecked. By default it is unchecked. For an electronic signature request e-mail to be sent at the time of confirmation, this box should be checked.
Signature Requested: This box may be checked or unchecked. By default it is unchecked. For an electronic signature request e-mail to be sent at the time of confirmation, this box should be checked.
Note: It is important that if the signature requested check box is checked on this tab, the automatic e-mail check box is also checked, to ensure that the e-mail with the signature request gets sent at the appropriate time. These options work in unison to ensure that the signature request e-mail is sent at the time of confirmation.
Mobile Check-In Confirmation: This field allows you to add the custom email that will be sent to a guest once mobile/contactless check-in has occurred, containing the electronic key code details allowing the guest to enter the accommodation. This is drop-down menu. Use it to select the custom email containing the details allowing them entry into the accommodation, that will be sent to the guest once the check-in process has been completed If the option you desire is not available in the drop-down menu, you can create one. See How To Create or Customize Your Documents for more details. The text field below can be used to add custom Mobile Confirmation Card text (using HTML tags for specific formatting) to the footer of Skyware's standard confirmation card.
The Web / E-mail tab area allows you to enter settings for your Skyware web site. More importantly this is where the setup is done to allow Skyware Systems to send out e-mail documents.
From this screen you can suppress the calendar, enter e-mail settings, enter a custom message when there are no rooms left to display, and enter a cancellation policy or custom mobile confirmation text. You will also use this tab if you wish to send automatic custom confirmation e-mails to your guests, which may include an electronic signature request. (See Electronic Document Signing for more details).
Hide the web calendar for the external web reservation system: This box may be checked or unchecked. By default it is unchecked.
Allow Multiple Room Types to be selected at the same time: This box may be checked or unchecked. By default it is unchecked.
E-Mail Address: This is the email address for your property, that you wish the confirmations (and any other
emailed documents) to originate from. Enter it manually into the field.
CC (Optional): Email a Carbon Copy of the emails sent to this address. This field is optional, either enter it manually into the field or leave it blank.
Managers E-Mail: This is the email to send interface and other issues to, from Skyware Systems. Enter it manually into the field.
Maintenance E-Mail: Email to send maintenance requests to, when added. Enter it manually into the field.
SMTP E-Mail Server: This is the SMTP Email Server address for your Property. Enter it manually into the field.
Port: This is the SMTP Server Port Number. The default number is 25. You should change it to the Port number for your property.
SMTP Password: This is the SMTP Email Server Password for your property. Enter it manually into the field.
Check-in E-Mail: This is an option for a custom email Check-In Confirmation. You can select one from the available options in the drop-down menu, or leave it blank (to send no e-mail). If the option you desire is not available, you can create one. See How To Create or Customize Your Documents for more details.
Days to Email before check-in (0=Immediately): This option goes with the Check-In Email - if you have selected a document to send, you MUST specify here how many days before check-in it should be sent. By default the option -0- is entered in the field, meaning the selected e-mail will be sent at the time of check-in.
Signature requested?: For an electronic signature request e-mail to be sent as the check-in email, this box MUST be checked. Otherwise, the e-mail sent as the check-in e-mail will not require a signature.
Check-in E-Mail #2: You can choose to send a second follow-up custom Email confirmation. You can select one from the available options in the drop-down menu, or leave it blank (to send no email). If the option you desire is not available, again you can create one.
Days to Email before check-in (0=Immediately): This option goes with the Check-In Email #2 option - if you have selected a document to send, you MUST specify here how many days before check-in it should be sent. By default the option -0- is entered in the field, meaning the selected email will be sent at the time of check-in.
Signature requested?: For an electronic signature request e-mail to be sent as the check-in #2 email, this box MUST be checked. Otherwise, the e-mail sent as the check-in e-mail #2 will not require a signature.
Note: Whilst it is possible to select BOTH Check-in E-Mail and Check-In E-Mail #2 as requesting signatures, it is recommended that only one or the other actually be chosen for the guest signature request. Only one copy of a guest signature should be required.
Check-Out E-Mail: This is an option for a custom email Check-Out Confirmation. You can select one from the available options in the drop-down menu, or leave it blank (to send no email). If the option you desire is not available, you can create one.
Days to Email after check-out (0=immediately): This option goes with the Check-Out Email - if you have selected a document to send, you can specify here how many days after check-out it should be sent. By default the option -0- is entered in the field, meaning the selected email will be sent out immediately on the guest checking out.
Check-Out E-Mail #2: You can choose to send a second follow-up custom email Check-Out Confirmation. You can select one from the available options in the drop-down menu, or leave it blank (to send no email). If the option you desire is not available, you can create one.
Days to Email after check-out (0=immediately): This option goes with the Check-Out Email - if you have selected a document to send, you can specify here how many days after check-out it should be sent. By default the option -0- is entered in the field, meaning the selected email will be sent out immediately on the guest checking out.
Automatic Cancel E-Mail: This is an automatic Cancellation email that gets sent out from your property when a reservation is canceled. You can select one from the available options in the drop-down menu, or leave it blank (to send no email). If the option you desire is not available, you can create one. Again, see How To Create or Customize Your Documents for more details.
External Reservation Disclaimer: This field is for the external reservation disclaimer that will be displayed on Skyware’s external web reservation system. Enter it manually into the field.
External Mobile Check-In Disclaimer: This field is for the external mobile check-in disclaimer that will be displayed when the guest uses the mobile check-in option after reserving a room using Skyware’s external web reservation system. Enter it manually into the field.
External Mobile Confirmation Message: This field is for the external mobile check-in confirmation message that will be displayed when the guest uses the mobile check-in option after reserving a room using Skyware’s external web reservation system. Enter it manually into the field
Custom "No Rooms Message" when booking from the external web reservation system: You can have a custom message that will display if no rooms are available for a specific date on Skyware’s external web reservation system. Enter it manually into the field.
Cancellation Policy: This is the custom Cancellation Policy that will be displayed on Skyware’s external web reservation system. Enter it manually into the field.
Custom Confirmation Page: This is the custom Confirmation Page that will be displayed on Skyware’s external web reservation system. Enter it manually into the field.
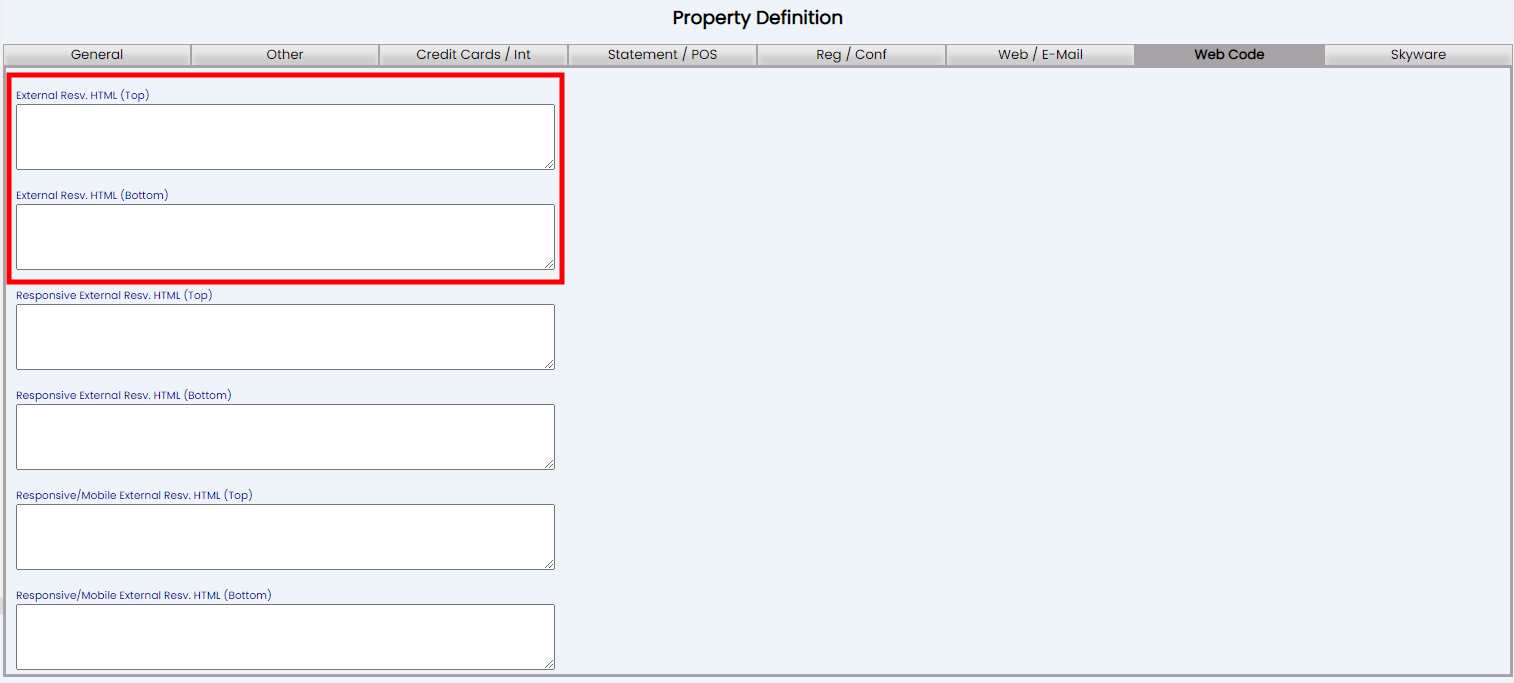
The Web Code tab allows you to enter the HTML code for the information for the top and bottom sections of the web reservation screen to “encapsulate” Skyware’s reservation system.
Note: The fields to be completed here are dependent on the Web Reservation (Web Booking Engine) site version used by your Property. Only ONE set should be used. Enter the relevant HTML text here into the appropriate field(s).
For the FREE version supplied with Skyware, use the first two fields:
External Resv. HTML (Top): Top of the screen HTML string for the external reservation system.
External Resv. HTML (Bottom): Bottom of the screen HTML string for the external reservation system.
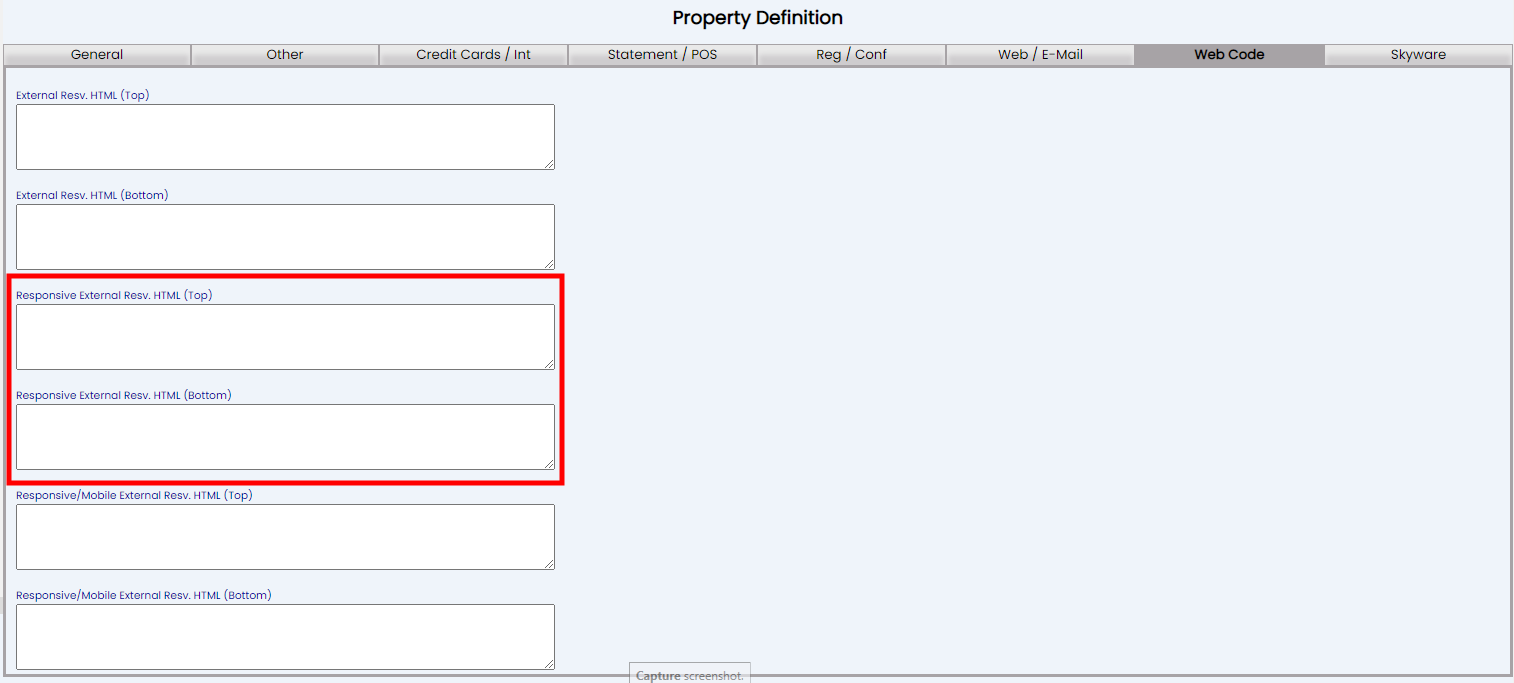
For the regular PURCHASED version:
Responsive External Resv. HTML (Top): Top of the screen HTML string for the responsive external reservation system.
Responsive External Resv. HTML (Bottom): Bottom of the screen HTML string for the responsive external reservation system.
For the NEW purchased (ADA compliant) version:
Responsive/Mobile External Resv. HTML (Top): Top of the screen HTML string for the responsive/mobile external reservation system.
Responsive/Mobile External Resv. HTML (Bottom): Bottom of the screen HTML string for the responsive/mobile external reservation system.
Note: On any tab, if you decide you have made an error, click the "Cancel" button in the local tool bar to undo it rather than the back button in the browser. The back button will attempt to return you to the previous screen, rather than simply undoing whatever change you have made.
When you are finished adding or editing any Property Definitions, click the Save button to save the changes.
To view any changes made, click the Activity log button in the local tool bar.
Date Updated September 09, 2024